How to Put a Blade in a Ryobi Reciprocating Saw
To put a blade in a Ryobi reciprocating saw, press the tool-free blade release collar, push the blade in until it seats, and release the collar. Then pull firmly on the blade to confirm the lock holds before you start the saw.
On this page (8 sections)
- How do you install a blade in a Ryobi reciprocating saw?
- What should you check before inserting the blade?
- Which way do the teeth face when you seat the blade?
- How do you lock the blade and pull-test it?
- What's the difference between a tool-free collar and an older chuck?
- How do you pick the right blade for the material?
- Why does the blade keep coming loose?
- Which blades and saw work best for a Ryobi owner?
To put a blade in a Ryobi reciprocating saw, press the tool-free release collar on the nose, slide the blade in until it seats, and let the collar snap back over it. Pull on the blade to confirm it's locked, then check the teeth face the right way before you cut.
The current Ryobi ONE+ 18V saw uses this keyless collar, so the whole job takes seconds once you know where to press. This guide walks through seating the blade, checking the direction, and pulling a test before the trigger.
How do you install a blade in a Ryobi reciprocating saw?
Press the collar, insert the blade, release, and pull-test. That's the full sequence on a Ryobi ONE+ saw with the tool-free chuck, and it works the same whether the saw is new or already has a blade in it.
Start with the saw off and the battery removed so the trigger can't fire while your hand is near the blade. Locate the collar on the front of the saw, just behind the blade shoe.
It's the ring you squeeze toward the body to open the chuck.
Push the blade into the slot until it stops against the internal stop, keeping the shank straight so it doesn't catch on the collar. Release the collar and feel it clamp down.
The saw's collar holds the blade by its shank tab, so a blade pushed only partway in will sit loose.
A 3,400 SPM saw like the Ryobi ONE+ 18V puts real force through that connection. Seat the blade fully every time rather than trusting a partial push.
If you want the full picture of how the stroke and shoe interact, read how does a reciprocating saw work before your first cut.
What should you check before inserting the blade?
Check the blade's shank, length and tooth count first. A blade that fits the chuck but suits the wrong material wastes time and dulls fast.
Standard reciprocating saw blades have a 1/2 inch shank with a small tab, and that's the fit Ryobi's collar takes. Most blades sold for sawzalls use this shank, including the DeWalt and TOLESA sets below.
Length matters too: a long blade reaches deeper into a cut but flexes more, while a short blade stays stiffer in tight spots.
Tooth count decides the material. Coarse teeth clear wood and demolition waste quickly, while fine teeth leave a cleaner edge in metal.
For a full breakdown of tooth counts and lengths, see which reciprocating saw blade to use.
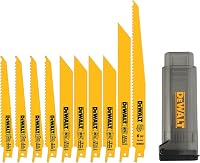
DeWalt's set spans 6 to 9 inch blades in 6, 10, 14 and 18 TPI, plus a storage case that expands for 9 inch blades. That range means one case handles most jobs around the house.
Pick the blade for the material before you touch the saw, then seat it.
Which way do the teeth face when you seat the blade?
Point the teeth down toward the work when the saw is in its normal position. The cutting edge faces away from the shoe so the teeth bite on the upstroke and clear chips as the blade moves.
Hold the saw as you would to cut and look at the blade. The sharp points should face the material, not the sky.
Many blades print an arrow or the word "up" on the flat side to take the guesswork out. If yours has no marking, trace a tooth tip and see which way it points.
The exception is a flush cut, where you turn the saw sideways to run the blade flat against a surface. In that position the teeth still need to face the cut.
A blade seated the wrong way will chatter and burn rather than cut.
Ryobi's collar doesn't care which way the blade faces, so direction is on you. Seat it, look at it, and flip it if the teeth point the wrong way before the first cut.
How do you lock the blade and pull-test it?
Release the collar, then tug the blade firmly toward you. If it moves, it isn't seated; pull it out and start again.
The collar should spring back on its own once you let go. Give the blade a steady pull of a few pounds, not a yank.
A properly seated blade stays put and feels solid in the chuck. A blade that slides or wiggles needs to come out, get cleaned of any grit on the shank, and go back in until it stops.
Run the saw for a second in the air before cutting. A blade that's seated but not locked will rattle or wobble at speed.
If the saw runs smooth and the blade stays put, the install is done.
This test takes seconds and catches the one mistake that matters most. A loose blade in a reciprocating saw can slip mid-cut and damage the work or the shoe.
What's the difference between a tool-free collar and an older chuck?
The current Ryobi ONE+ 18V saw uses a tool-free collar; some older Ryobi saws use a keyed chuck. Knowing which one you have tells you whether you need a hex key.
The ONE+ 18V model has a collar you press by hand, so no key is involved. Older saws and some other brands use a chuck with a hex socket that needs an Allen key to loosen and tighten.
On those, the key often clips onto the tool.
If your saw has a socket, turn the key to open the chuck, slide the blade in, and tighten it firmly. Don't overtighten past snug; the blade needs to sit flat and fully seated.
When in doubt, look at the nose of your saw. A smooth ring you can squeeze means tool-free; a round hole with a set screw means keyed.
How do you pick the right blade for the material?
Match the tooth count to the material and the length to the depth of cut. The blade install is quick, but the wrong blade makes the saw work harder than it should.
A 14 TPI bi-metal blade cuts metal pipe and sheet well, while 6 TPI clears wood and demolition waste. Fine teeth on thick wood clog; coarse teeth on thin metal snag.
Buy a mixed set so you can swap in seconds when the job changes.
TOLESA's blades are bi-metal with an 8% cobalt edge and 14 teeth per inch, built for medium to thick sheet metal and pipe. The 9 inch length gives reach on pipe and profile cuts.
Five blades in a pack means a spare is always within arm's reach when one dulls.
For a wider look at what a reciprocating saw handles, see what is a reciprocating saw good for. A blade swap is the fastest way to change what the same saw can do.
Why does the blade keep coming loose?
The blade usually isn't seated all the way, or the collar didn't close fully. Pull it out and push it back in until it stops, then let the collar snap shut.
Grit or metal dust on the shank can stop the blade from seating deep enough. Wipe the shank clean and try again.
A worn blade tab or a tired collar also loses grip, so try a fresh blade before blaming the saw.
If the blade still slips with a clean shank and a fresh blade, the collar or chuck may be worn. Stop using the saw until you've had it looked at.
A blade that leaves the chuck at full speed is a hazard, not a minor annoyance.
Which blades and saw work best for a Ryobi owner?
The Ryobi ONE+ 18V saw with a mixed bi-metal blade set covers most home jobs. Seat the blade in the tool-free collar, check the teeth, pull-test, and cut.
The ONE+ 18V runs on the Ryobi battery platform and has variable speed, so you can slow down for metal and speed up for wood. It's a tool-only saw, so you supply the battery.
Pair it with the DeWalt set for a blade for each material and a case to keep them together. If you cut metal often, the TOLESA 14 TPI pack keeps spares handy.
The order for putting a blade in a Ryobi reciprocating saw never changes: collar, seat, direction, pull-test. Do those four steps every swap and the blade stays locked through the cut.
Frequently asked questions
Does a Ryobi reciprocating saw need a hex key for the blade?
The current ONE+ 18V saw uses a tool-free collar, so you press and release it by hand. Older Ryobi saws may use a chuck that needs a hex key, and that key often stores on the tool.
Check your own saw's chuck before buying blades.
Which way do the teeth face on a reciprocating saw blade?
Point the teeth down toward the material when the saw is held in its normal cutting position. The blade's cutting edge faces away from the shoe so the saw pulls the tool into the cut on the upstroke.
Flip the blade only for flush cuts where the body would otherwise block the shoe.
Can you use DeWalt or TOLESA blades in a Ryobi saw?
Yes. Standard 1/2 inch shank reciprocating saw blades fit Ryobi saws, and both DeWalt and TOLESA make blades with that shank.
The TOLESA set names Ryobi among its compatible tools.
Match the blade's length and tooth count to the material first, since fit is the easy part.
Why does my blade keep falling out of my Ryobi saw?
The blade is probably not seated all the way, or the collar is not fully released over the blade tab. Pull the blade out and push it in again until it clicks or stops, then let the collar snap back.
If it still slips, the collar or blade shank may be worn.